
Today, Git and GitHub are some of the most essential parts of any software development team. They are also backed by some of the most popular Open-Source Projects. So, it is essential to learn about Git and GitHub as a developer in a company or for yourself.
In this article, we will be guiding you through the basics of Git and GitHub. You will be learning the basics of these tools, how to create a repository on your local computer and on GitHub. We will also discuss and learn about how you can synchronize your local repository with the remote one on GitHub. So, Let’s Get Started..!!
What is Git?
Git is a free, Open-Source version control system. This basically means that Git is a content tracker. So, it helps to store the content and it’s mostly used to store the code because of the other features it provides.
In real life, there are many developers behind a single project working in parallel. So, they need a version control system like Git to ensure that there are no code conflicts between the developers.
Also, sometimes, a new version of the software may contain a bug that requires a lot of time to be solved or the requirements can change, so the team of the developers can go back to their older versions of the software.
The branching system in Git allows a developer or a team of developers to work on a task without conflicting with the main codebase. So, basically, Git is a small software that controls your code.
Some of the companies using Git as their version control
- Netflix
- Udemy
- Lyft
- Shopify
- Robinhood, and much more
Terms used in Git

Git States
There are primarily three states in Git.
- Modified: Files that have been changed, but Git does not know about what changes have been made in those files. These changes won’t be a part of next snapshot or commit.
- Staged: Files that was changed before, are now tracked by the Git and will become a part of next snapshot or commit.
- Committed: Changes in the file are now successfully added to the latest snapshot.
Git Repository
A repository (or “Repo” in short) is the folder or directory where your entire project is stored. It can either be in your Local Machine or hosted online. It contains an entire codebase and its revision history. Some popular online hosting services are GitHub (by Microsoft), GitLab (by GitLab), and BitBucket.
What is Git Commit?
Let’s understand this with an example. Think of Git like a tool that stores or manages timestamps. Commits are the units in that timestamp. With the commit command, we create those individual events.

The commit command captures a snapshot of the project at a particular time. Committed snapshots can not be changed on their own. Before we use git commit, we need to use git add command to promote any changes made in the project.
What is Git Clone?
The git clone command is used to copy a repository. You will get your version of that repo and you can make changes to it without altering the original one. Most of the time, the original version is stored on a remote server like GitHub.
What is Git Pull?
The git pull command is used to download and access the files on the remote repository so you can update your local repository with the latest files from the original and merge them down. The Git Pull command is made up of two commands: git fetch and then git merge.
What is Git Push?
The git push command is used to send back all the changes made to the local file and update the remote repository.
What is Git Checkout?
The git checkout command is used to switch between the branches or restore working tree files. Think of it as switching between different versions or features of the project. This command uses three entities: files, commits, and branches.
What is Git Tag?
Git Tag is a reference in a project at a specific moment. Tagging allows the developer to mark important checkpoints in a project. We often call it versions of the software.
What is GitHub?
GitHub is a platform to host the code online remotely. It helps developers to collaborate on projects of any size. Because of the remote repository, GitHub allows you to share code with other developers who want to work on a particular project, and this is what opens the doors to the world of Open-Source!
To create your repository on GitHub, you need to create a personal account on GitHub [must create an account, if you don’t have one].
Benefits of having a remote repository
- Every contributor contributing to the project know that they will get the correct and updated code from that particular remote repository.
- It serves as the single source of truth, as each changes are being pushed to the remote repository instead of sharing updates to each individual contributors.
- Contributors and collaborators can use of GitHub’s project management and automation tootls to make development fast and efficient.
Getting Started with Git
1. Installing Git
– For Windows
To install Git in Windows 10, read our How to Install Git in Windows 10 blog
– For Linux
For a Debian-based Linux, such as Ubuntu, you can run the following command in the terminal.
sudo apt install git-allOnce you have installed Git, you can run git commands locally. To check whether Git has been successfully installed or not, run the following command.
git --versionThe output should be the current version of Git installed on the computer.
– For macOS
For macOS, you can go to https://git-scm.com/download/mac and use any of the methods shown.
Once you have installed Git, you can run git commands locally. To check whether Git has been successfully installed or not, run the following command.
git --versionThe output should be the current version of Git installed on the computer.
2. First time configuration
The git config the command is used to set the configuration variables which consist of your username and email address. Run the below command to configure git on your system.
git config --global user.name "UserName"
git config --global user.email "[email protected]"
You can verify your details entered above by using the below command.
git config user.name
git config user.email
Working with Git and GitHub projects
We can work on Git and GitHub projects in two ways.
Way 1: Create remote repository, clone it on your PC and work on it (Recommended)
It involves creating a totally fresh repository on GitHub and cloning it to your local computer or laptop, working on it, and pushing back.
Create a new repository by login into your account and clicking the “New Repository” button.
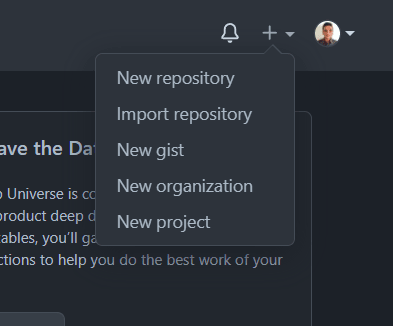
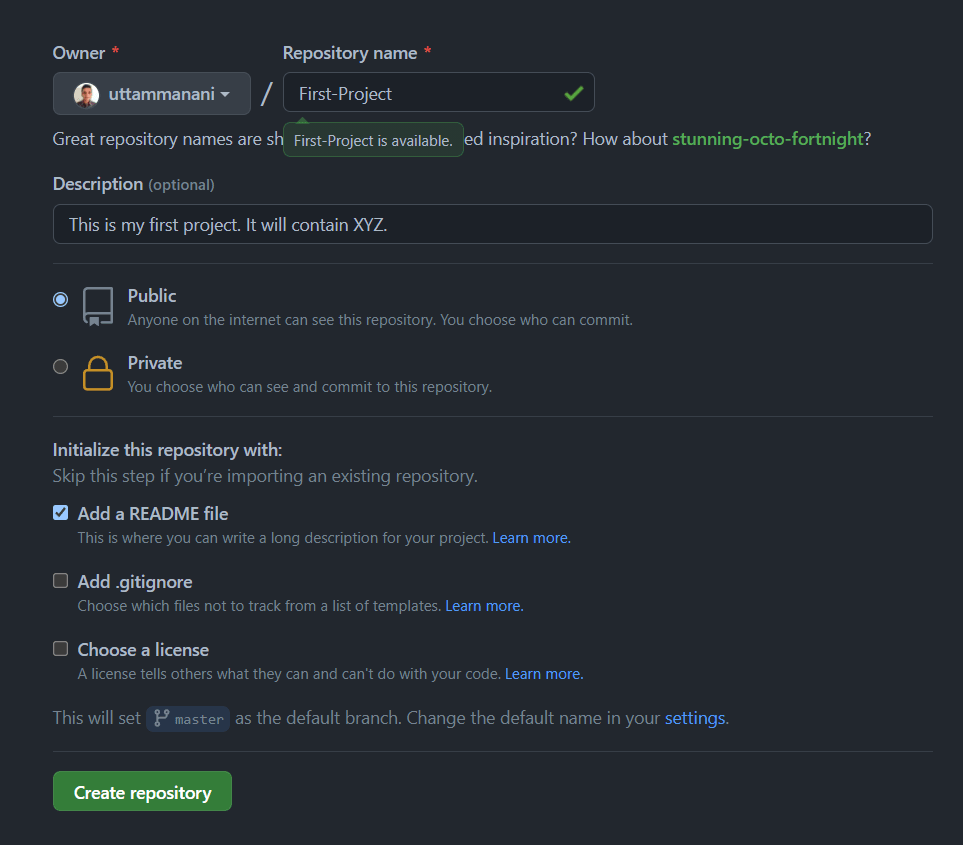
Give a suitable name to your remote repository, add a description, check the “Add a readme file” checkbox, and press the “Create repository” button.
Well, now you created your first repository on GitHub.
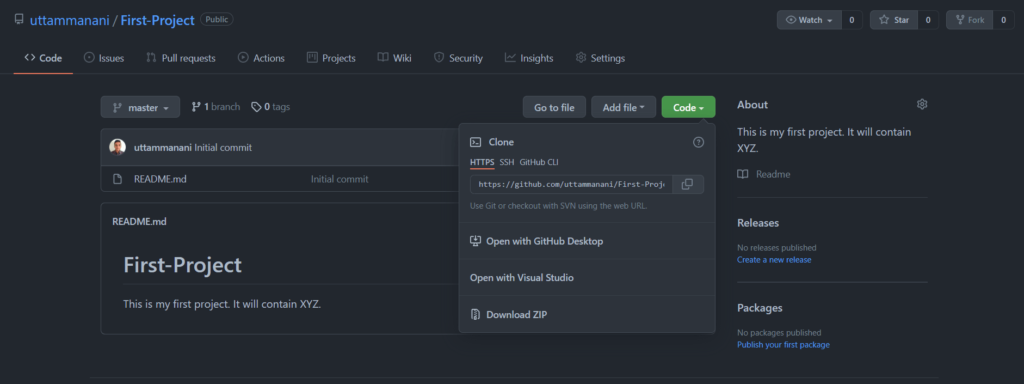
Now, it’s time to copy that same repository to your local computer. For that, we need to “clone” that repository.
To clone a repository means copying or downloading all the items in that project to your local computer. For that, you need to get the HTTPS address by clicking on the “Code” button, as shown below, and copy it.
After copying the HTTPS Address of the repo, open your machine’s terminal, and go to the desired location where you want to make a local copy of the project or repo. Use the below command to clone the repo to your local machine.
git clone <HTTP ADDRESS>
// example: git clone https://github.com/uttammanani/First-Project.git
After executing the above command, wait till all the files are downloaded to your local machine.
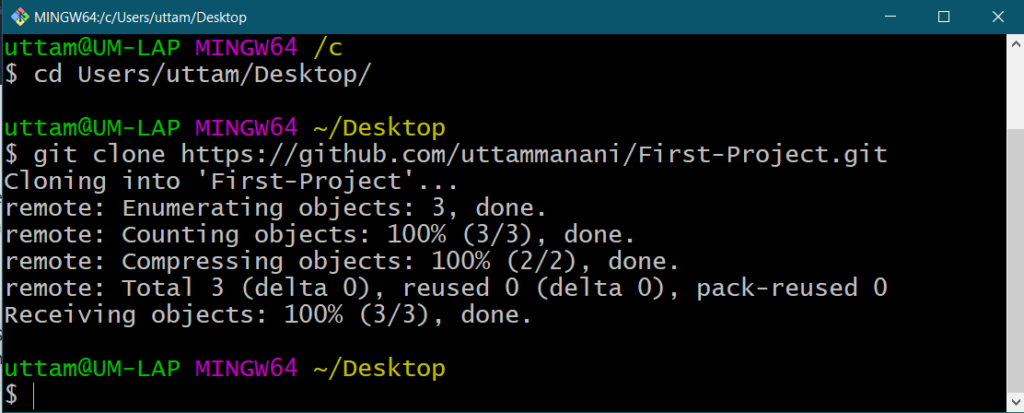
Now, you have a local copy of the repo into your machine.
Great..! This is the actual time to work on the project. Work on your project, make any changes you want to do and save it locally. To save your work on the remote server – like GitHub, there is a process called “commit”. To do this, again go back to your terminal, and go to the location of the project.
Now, in the terminal, you are at the directory of the project repo. There are 4 steps to perform a commit: ‘status’, ‘add’, ‘commit’, and ‘push’. All the steps must be performed from the same directory of the project, and in sequence. Let’s see all of them one by one.
1. ‘status’: This command lists the files which have been changed or new folders added all over the project. To do this, run the below command in your terminal:
git statusLet’s add 2 files to the local project, named ‘file-demo.txt’ and ‘first-program.py’. As you can see below picture that after executing the git status command, it will show new files added or made changes to the files.

2. ‘add’: This command is used to add all untracked or modified files to the staging area. We can use this command in two ways: Add all the files to the staging area at one go, and another is adding files one by one to the staging area. The below command will be used to add all changes:
git add .The below command will be used to add files one by one:
git add <FileName> <FileName> <till n File>For example:
// for adding files one by one
git add file-add.txt file-add-1.txt

// for adding files at one go
git add .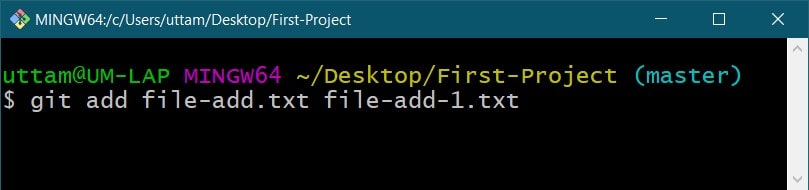
3. ‘commit’: Now, we have added files of our choice to the staging area, we need to commit those changes using an appropriate message, like what changes we have made. This is useful when we need to see the change history of the project. Below is an example of what we can put with the commit command using our last edits.
// git commit command
git commit -m "MESSAGE IS REQUIRED, give appropriate message"

// git commit - our in our case
git commit -m "Added File-txt and File-txt-1"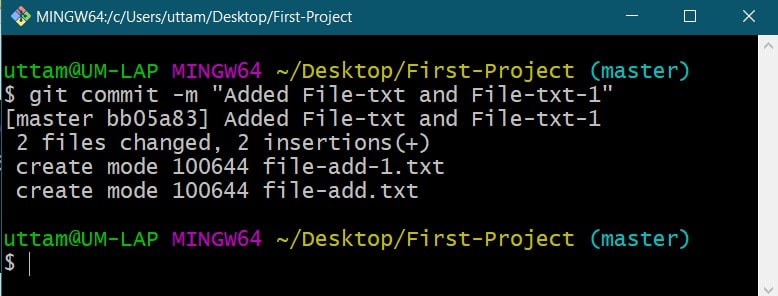
4. ‘push’: Now, it’s time to share all our work on the remote repository of GitHub. For that, we have to ‘push’ our files to the remote repository. The remote repository is a duplicate instance of our repository that is stored somewhere on GitHub’s server. To do this, we must know our remote’s name (mostly remote name is ‘origin’). To find out the name, use the following command:
git remote
As you can see in the above image, it is showing that our remote’s name is ‘origin’. Now we can ‘push’ our work in the remote repository using the following command:
git push origin master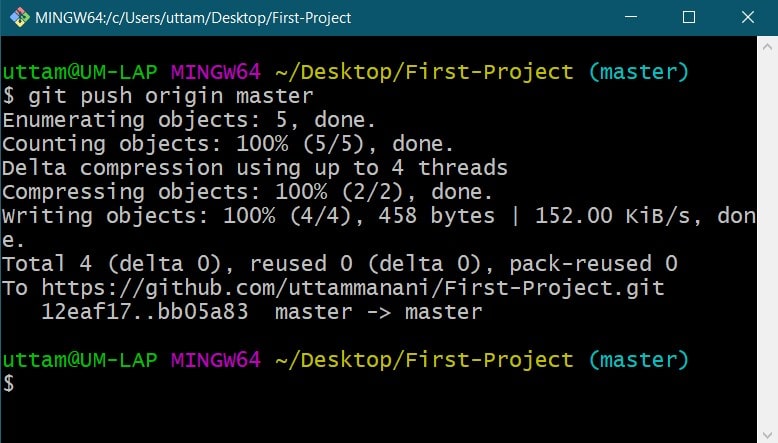
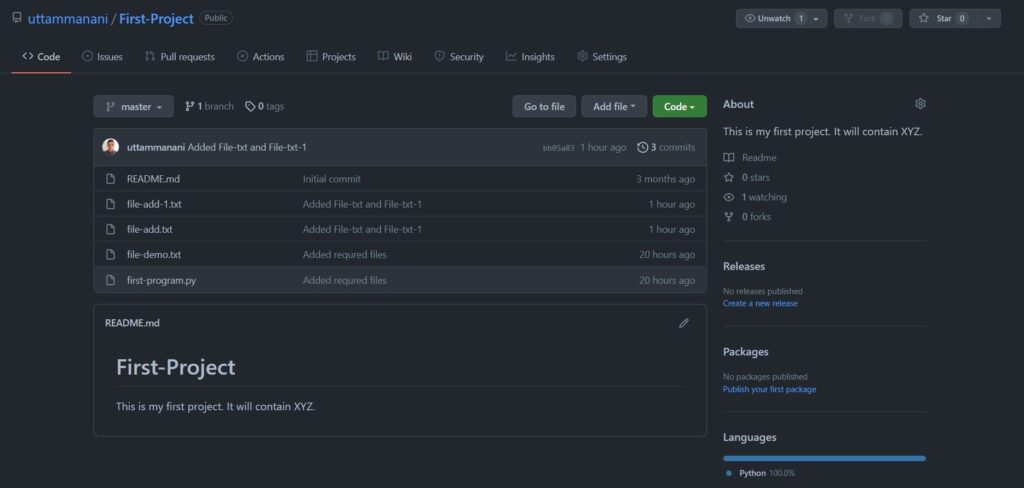
Now, if we go to the remote repository on the GitHub web page, we can see all the changes made in our local project to the remote repository as well.
NOTE: Sometimes by using the git command in the terminal, it will lead you to VIM text-editor, which is a CLI-based text-editor. So, to get rid of it, just type ‘:q‘ and hit Enter button.
Way 2: Create and work on local project, then create the GitHub repository and push it to remote
It involves creating a local project first and then sending it to GitHub. In a lot of cases, you might have made projects to the local computer and you wanted them to store somewhere remotely. So, GitHub helps you to do that.
We will learn this by making a fresh project named ‘Local-Project-Example’ and will create two random files on our local computer, that were not added to GitHub.
As earlier mentioned, make sure that you’re in the correct directory of the project in the terminal.

By default, any project or repository on the local computer is not a Git repository. But we can turn it into a Git repository by executing the following command:
git init
After converting our local project into a Git directory, we need to check the files in that repository by using the following command:
git status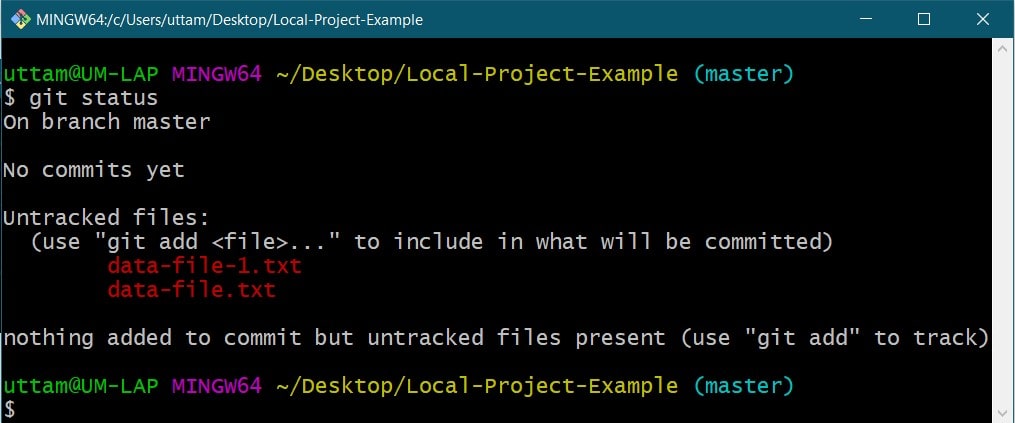
As of now, there are two files in the project, so we need to “add” to our repo.
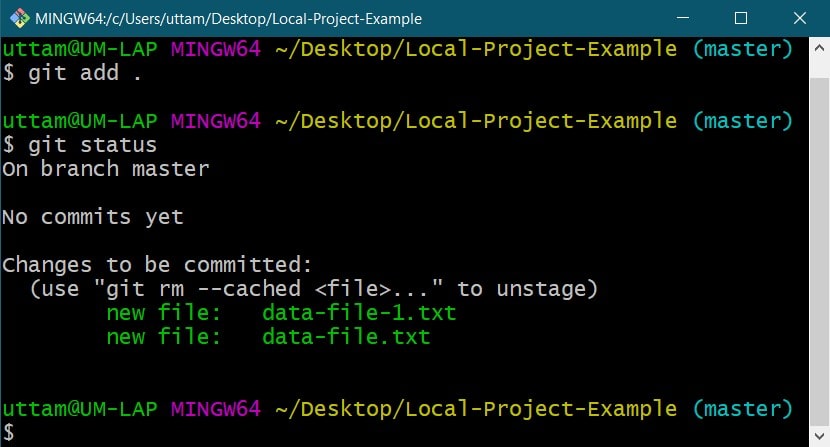
git add <FileName1> <FileName2> <...>Or, we can use the below command to “add” all the files in the repository in one go.
git add .After executing the above command, and all the files are added to the staging area (the add process), we can check whether the files are successfully added or not by executing the git status command.
If the file names are in Green color, as shown below, that means we have done our work successfully till now!
Then we have to commit this with a proper description or message.
git commit -m "Added Local-Project-Example"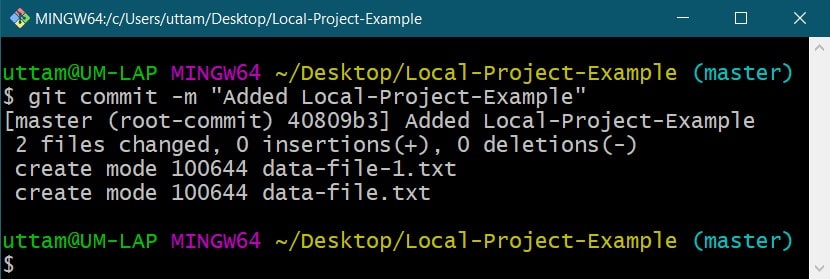
If we already had a repository in the remote server of GitHub, our local repository was automatically attached to the remote repository (As we saw in Way-1). But in this case, we are starting to work on a project locally, there is no remote repository attached to it, so we manually need to attach the remote repository with the local repository.
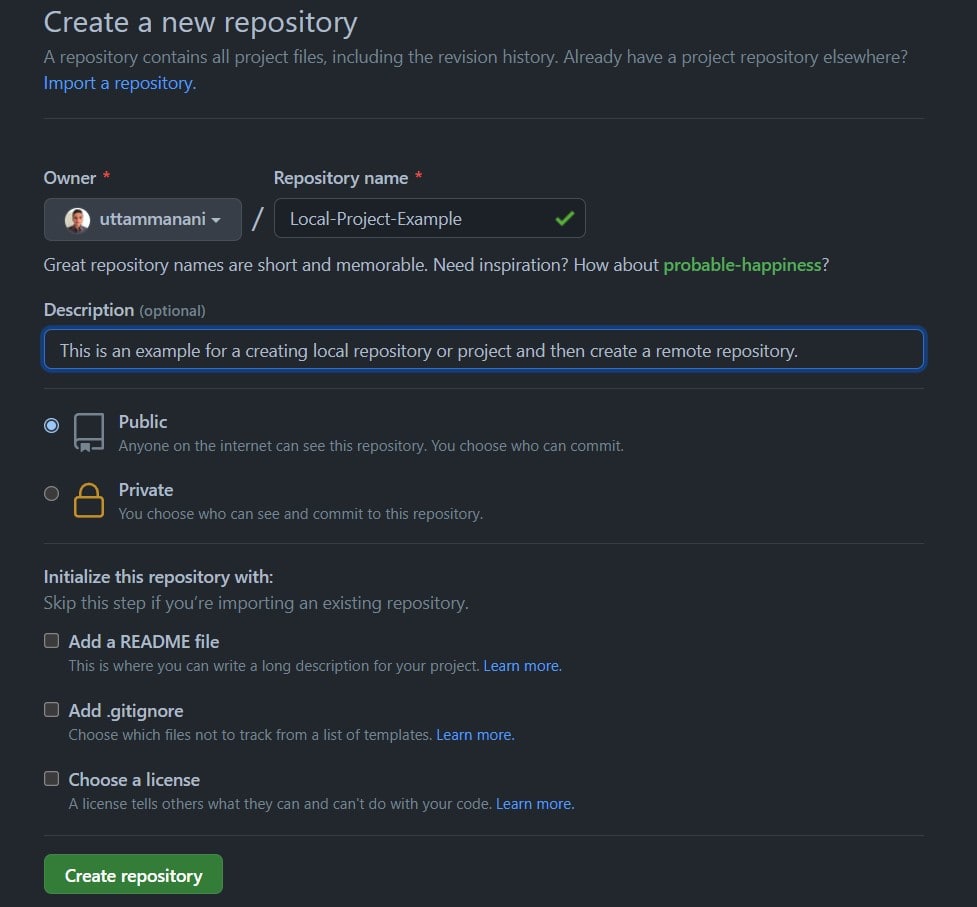
So, to do that, firstly we need to go to GitHub. Create a new repository with the appropriate name of your choice, and create a new repository.
NOTE: In Way-2, please do not initialize or create the repository with a README file in it.
After clicking on the “Create repository” button, you will find something as shown in the below image:
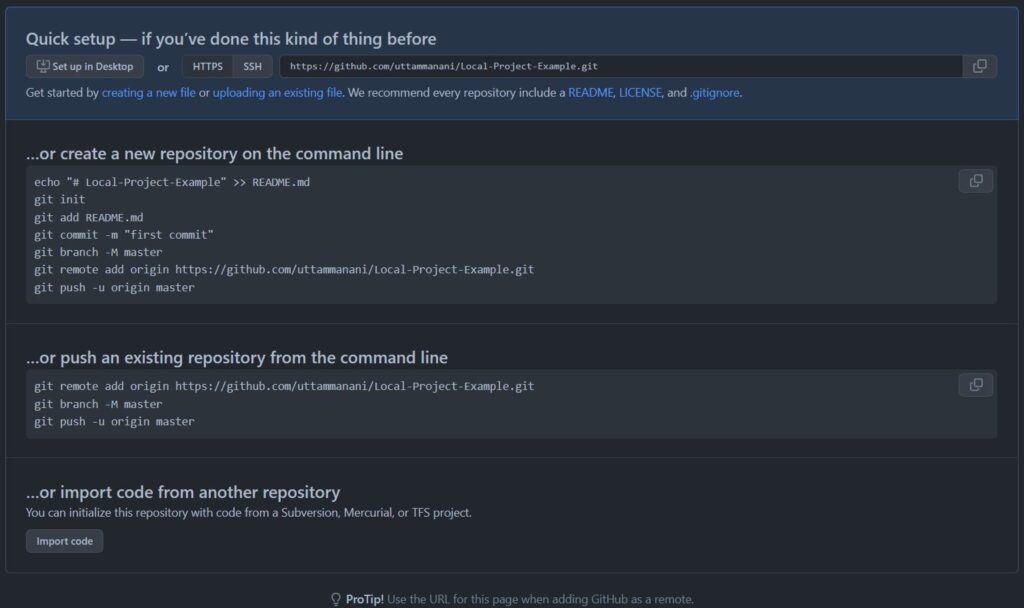
Copy the HTTPS address. Now we will create the remote for our repository using the following command in the terminal:
git remote add origin [HTTPS ADDRESS]After executing this command, we can check whether we have successfully added the remote repository or not using the following command:
git remoteAnd if the output is ‘origin‘, we’ve successfully added a remote repository to our local repository.
NOTE: Remember, we can give any name to our remote, for that, you can use the below command:
git remote add [REMOTE NAME] [HTTPS ADDRESS]Now, we can push our project to GitHub without having any problems!
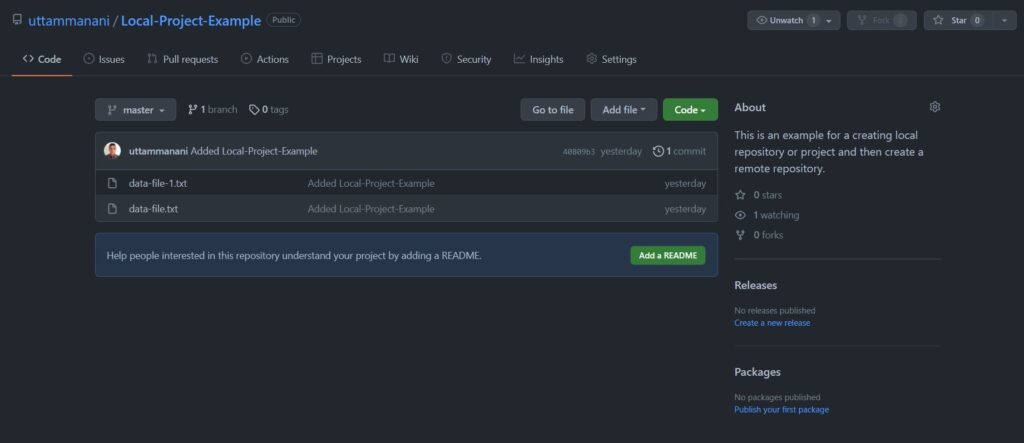
git push origin masterAfter completing the above steps one by one, you can find all the files are there in your GitHub’s remote repository with all the files in it!
Conclusion
This was all about the basics of Git and GitHub. In the next article, we will learn more about Git and GitHub.
We hope that we bring some value to your life through posting our content, might content meet your expectations. You can always comment on the post to give feedback or reach out to us through email for sharing what you like to read on our blog.
Reach out to us using email: [email protected]
Find More Articles on Our Website: EGrasps
Check out our other posts on Medium.
You can reach out to us on WhatsApp.